Some time in 2024 (I think it was in the middle of the year) I found out Te Awahou Collective had an upcoming exhibition at Te Manawa. This was a huge thing for me and I am thrilled to be part of a group that had the opportunity to exhibit there.
I was mulling over ideas in my head almost 24/7 since I first found out about it, and my original idea was to make a huge woven piece. I wasn’t sure how or with what materials (fabric strips or yarn, rope, or a combination of these), but I was hoping to make a random, wild kind of weave. It would have been a tapestry weave rather than a formal loom weave.
During some of the wananga at Albi’s studio, I still talked about my huge woven piece. The plan was for my giant weave to resemble a rite of passage with the three phases (separation, transformation, reintegration) visualised mainly through the use of colour and texture.
In September last year we all met with the team at Te Manawa, and it turned out that everyone wanted to make large work. I then decided to scale down somewhat, and let go of my 3×6 metre (or some such) idea. This made me think about making a number of smaller narrower weaves to be staggered in some way or another, so that the amount can be reduced if needed to make the overall work smaller. This idea kept developing and changing, until October when I finally pinned it down. We had to submit titles and artist statements, and coupled with an application for funding from the Earle Trust (that I was fortunate to receive) I had to get my ducks in a row. I had narrowed it down to five panels, each of which would represent an aspect or phase of ‘my life in textiles’, honouring the wahini who helped to shape my love of textiles.
By November I started in earnest with the making process.
I worked on the panels concurrently for months. When I didn’t feel like stitching, I would wrap, and when I didn’t feel like wrapping, I would knit, or weave. That is the joy of working on a number of works at the same time.
I’m always surprised at how long it takes to do certain things, despite me thinking I’m going at a good clip. Like the woven piece that took more than a month. And with regard to the stitching of the Bible verses on the tea bag quilt, although I did them in-between other things, it still took a good amount of time. Sometimes when another work needed to sit and brew for a bit, I would stitch a verse or two. All up there were about 40 verses.
Just some background: I grew up in a family of dressmakers, knitters, and crocheters. From a very young age, fabric and yarn have been part of my life, and I learned the skills of making wearables like you learn to speak a language.
My grandma worked for Kaplan Bros as a cutter, and later for John Orr’s as an alteration hand shortly after WW2. My mum also learned and utilised these skills to keep us clothed, and taught all three of her children, including my brother to stitch, knit, and crochet.
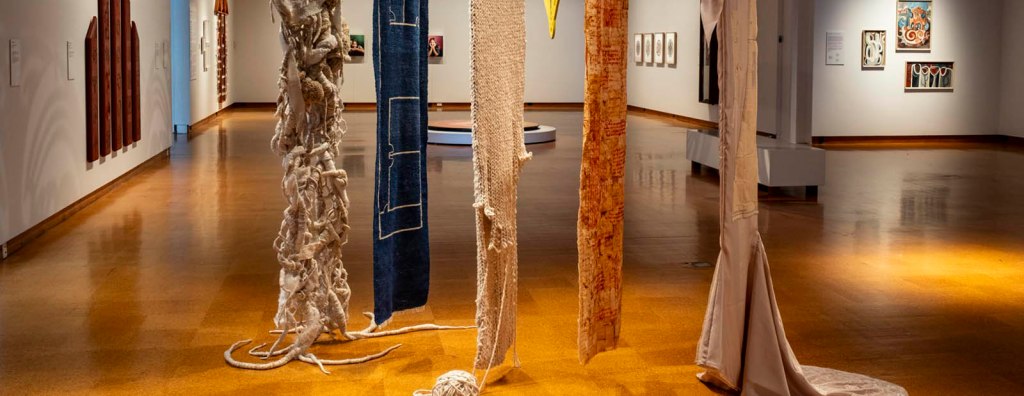
Together, the panels tell a story, a snippet of my life up to now: starting in South Africa with the first panel, and finishing in New Zealand with the fifth panel.
Panel 1
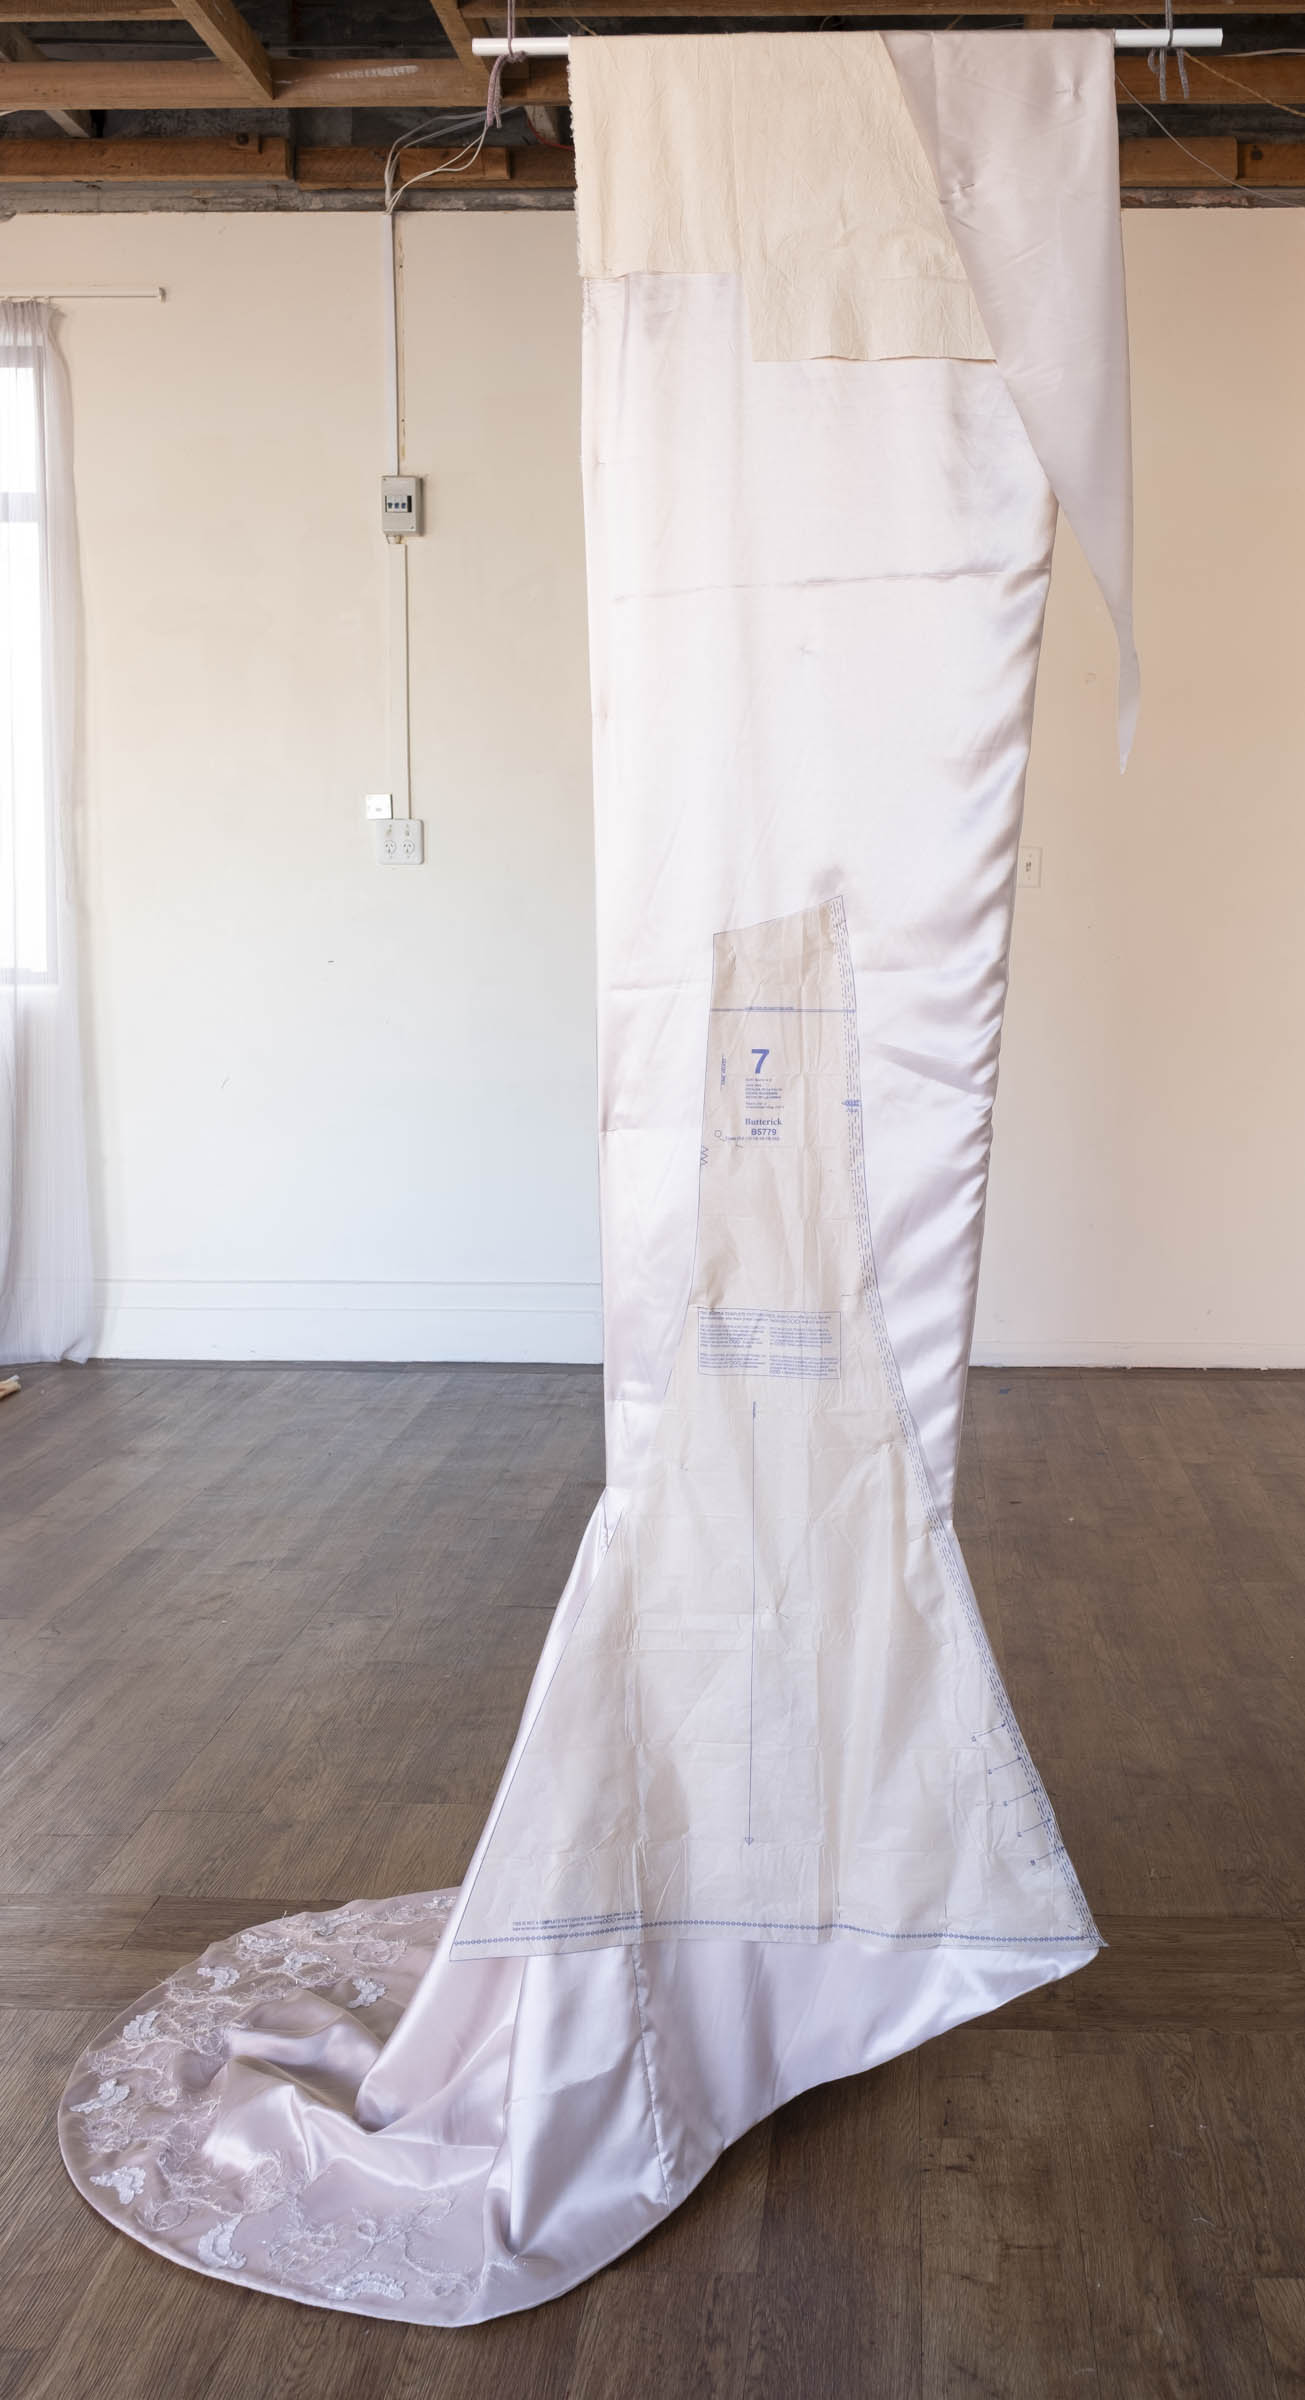
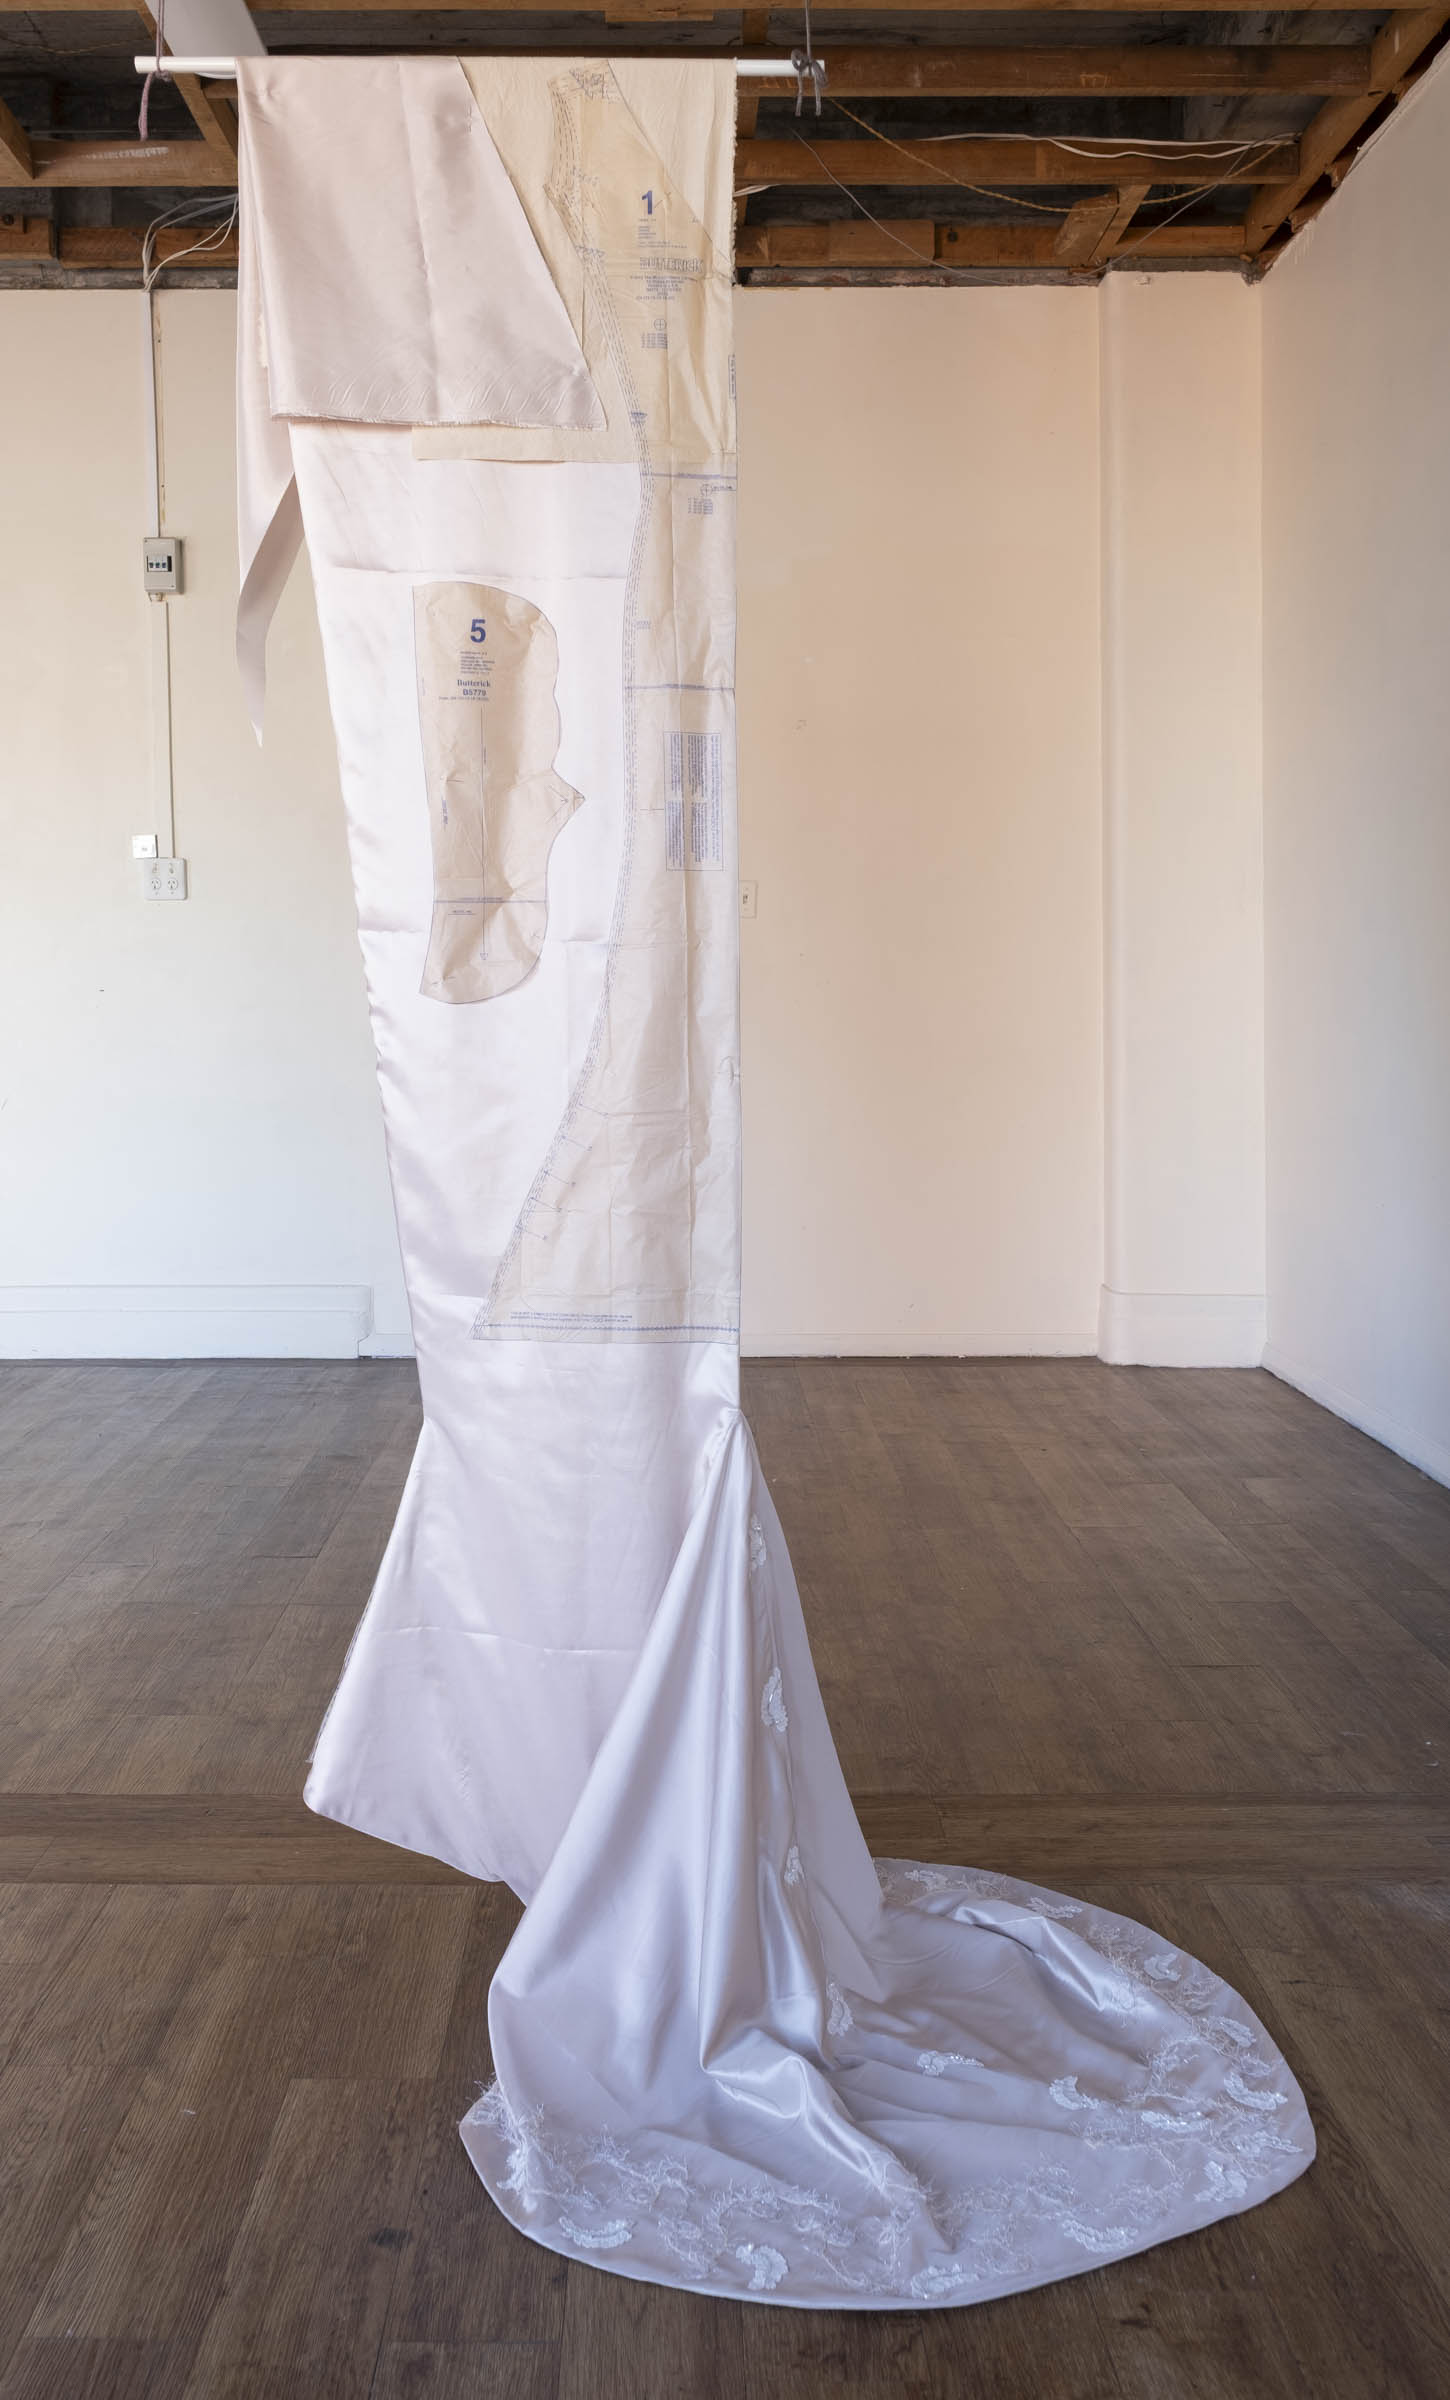
For the first panel I wanted to include something about my dressmaking history. Dressmaking has been engrained in my life and I ended up making a lot of clothes, not only for myself, but also for friends, including a number of wedding dresses and evening gowns. It has never been a formal ‘job’, always just a side hustle.
I started the top of the panel with raw materials, which gradually developed further down until it finishes on the floor with a formal dress-like train, complete with lace and beads.
As always, I wanted to use secondhand materials and offcuts. I found an evening dress pattern at an Opshop, which I wanted to include in the work. Searching through my stash I found a large piece of pongee (lining fabric). It had a shine to it, so I figured it will have to do for the ‘dress’. I lined it with calico remnants which I stitched together. There were some issues with using the lining as the outer layer and vice versa. The calico was too heavy for the pongee and was sagging on the rounds more than the pongee, which meant it was making a bubble at the hem, which had to be fixed before the install.
Working on a dress that is not a dress, is quite tricky. I thought it would be straight forward and simple, but dresses are 3D by nature and my panel is something between flat and 3D. It starts off flat and turns to 3D at the bottom. The transition was challenging.
An important element I wanted to include in the panel was pins. I’ll explain why pins have significance in my life …
Babies and kids copy what parents do. So if you see a kid behaving weirdly or saying something strange, you can be sure he got it from his parents. Haha.
There once was a baby who at the tender age of 16 months swallowed a dressmaking pin. She watched her grandmother who was sitting behind the sewing machine, working on a garment. The baby found a pin on the floor and placed it in her mouth, just like her grandma was doing. When the grandma saw the baby with the pin in her mouth, she gasped, which startled the baby who then swallowed the pin.
That baby was me. For ten days my mum sieved through my poop until the rusty pin finally emerged. What mothers won’t do for their children. All the old wive’s tales surfaced, including feeding the pin-swallower bits of cotton balls! The doctor said to just let it be – it will come out in due time. Which it luckily did.
I was hoping to somehow utilise this experience in the first panel, so tried to pin the pattern of my grandma’s sewing room floor onto the dress. It was small wooden tiles placed in groups of three to make a square, and each square was perpendicular to the block next to it. However, my pattern pinning plan didn’t work, so I let go of the idea.
The pins will have to wait for another project.
Panel 2
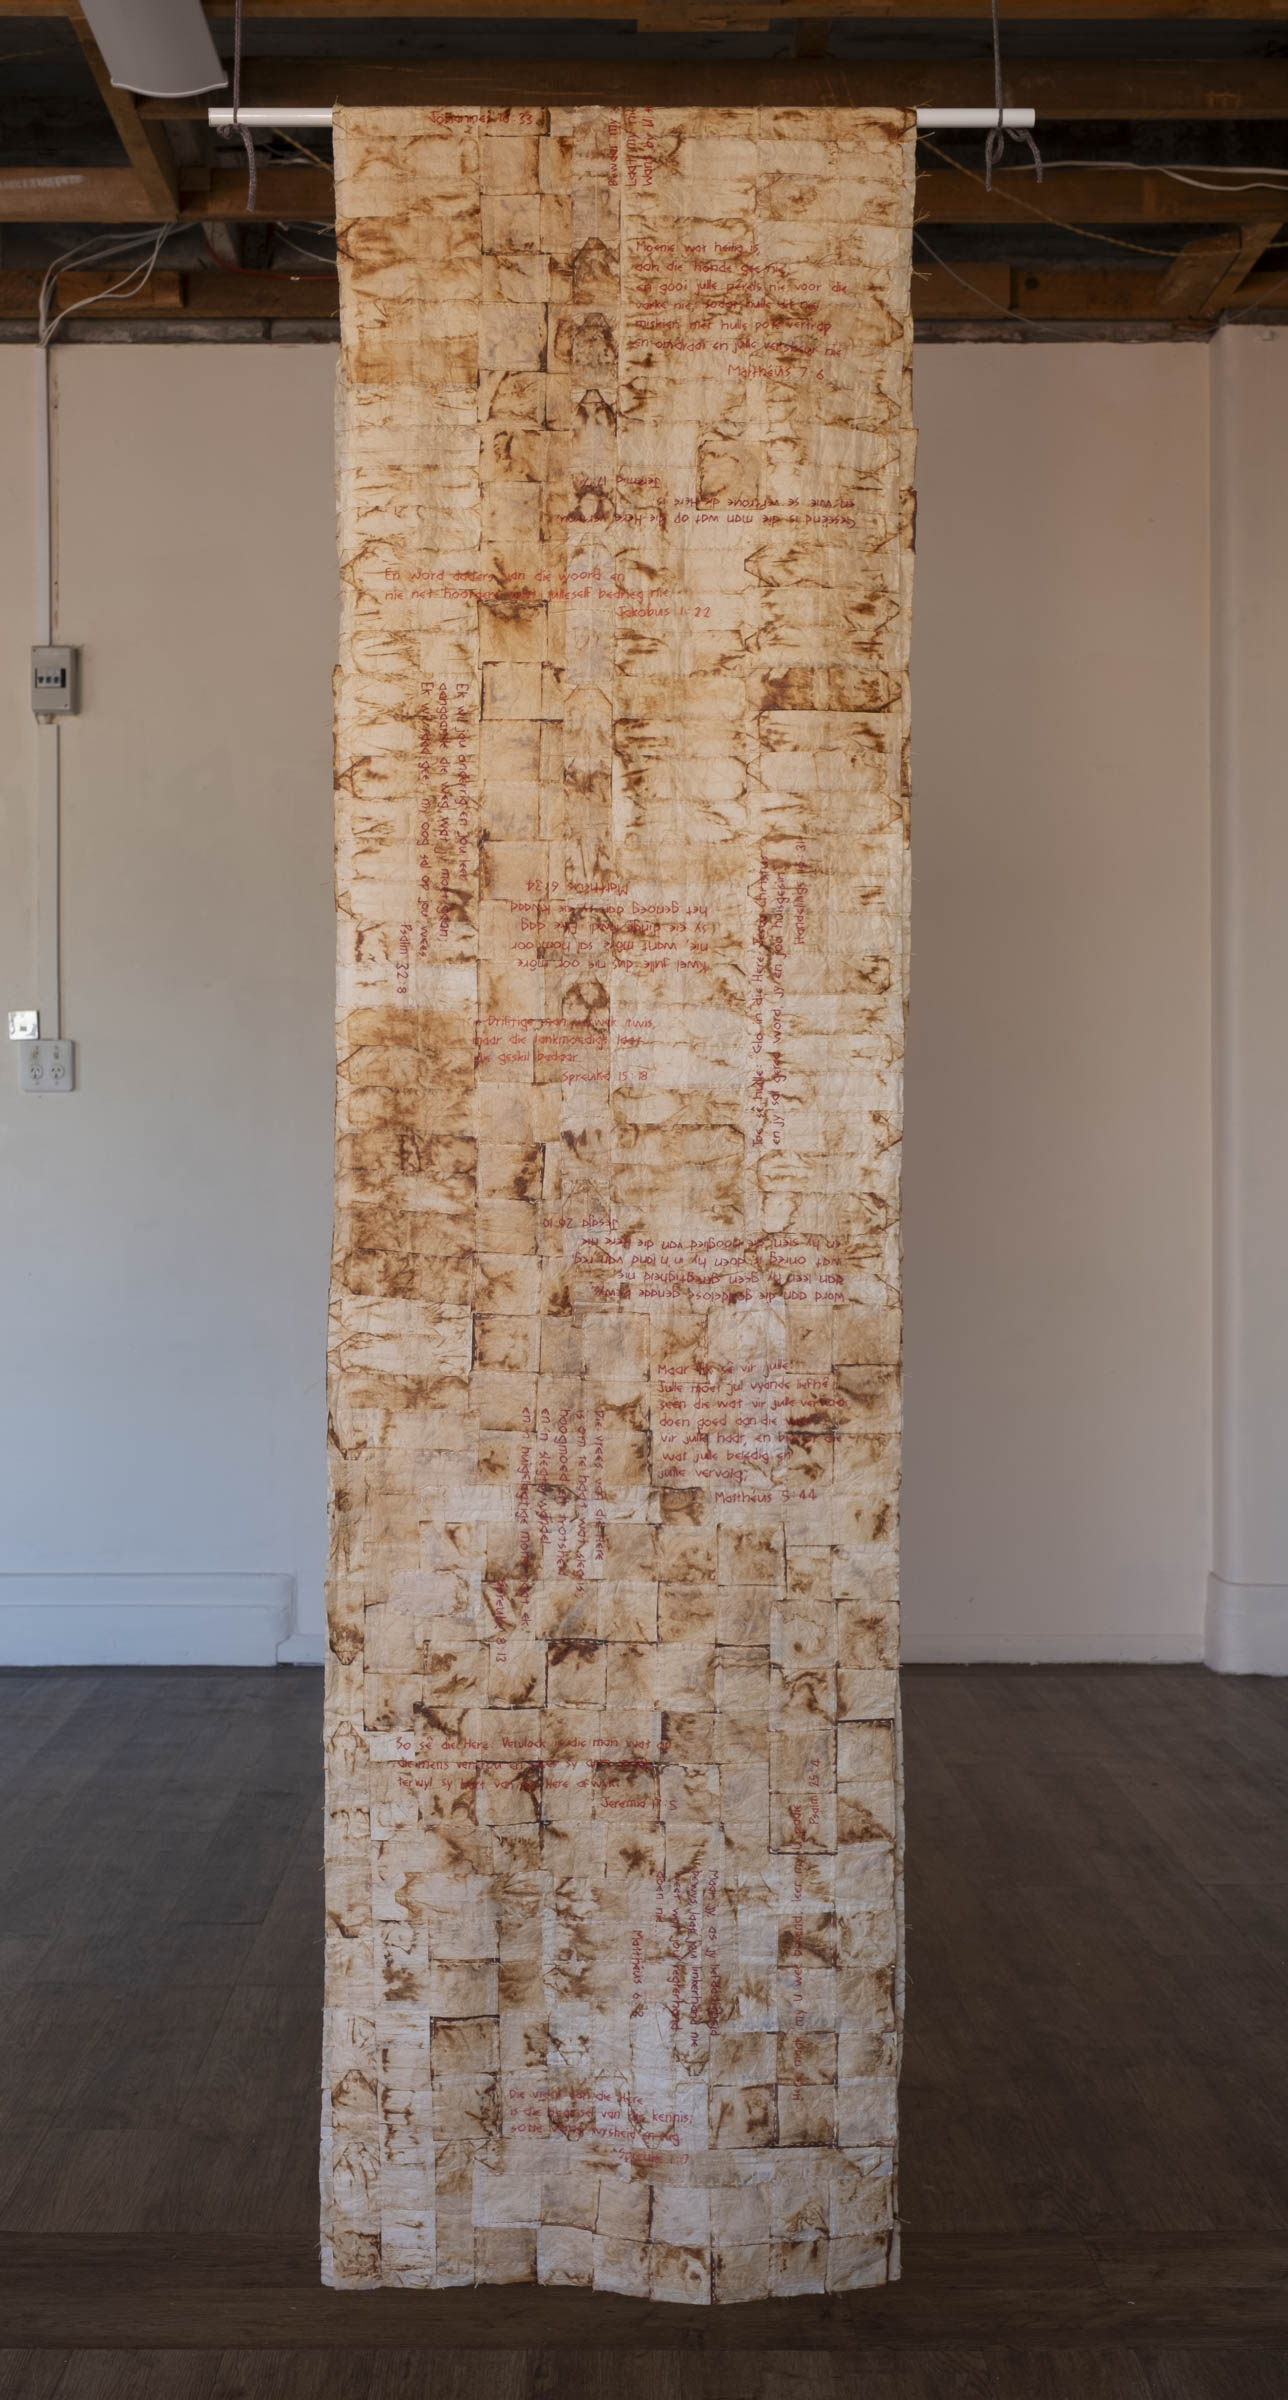
The second panel for my art installation was a tea bag quilt to be embroidered with text. This was already in the making for a few years, although it was initially only the raw materials without a clear outcome.
It was in 2022 that I started to collect used tea bags from the red bush tea I was drinking. Once they were dried and emptied out, I stitched them together by hand. This has been an ongoing process, so by the time I committed to making one of my panels from tea bags, I already had a bit done (perhaps a quarter). I still had to do the bulk of the work, however, as the panel was 500x4000mm. I got properly stuck into it during the festive season in December 2024. Every time we drove somewhere, I would be stitching.
Towards the end of January I had all the pieces together and could start embroidering the text. I decided to stitch the red bush teabags with some of my mum’s favourite Bible verses.
I always say jokingly that I was brought up on red bush tea and religion. That is not entirely true of course, and I’m always thinking to myself that I might be going straight to hell. We didn’t walk around with a Bible under the arm, or preached to anyone and everyone who crossed our path for that matter, but I guess one could say we had sound morals and respect for others, regardless of race, colour, or identity. Mum always says she brought us up well, we turned bad as we got older. Haha.
By all accounts I’m not a very good Christian I guess, as I have different views on religion to Christians. To me it’s a personal matter. What the next person believes and doesn’t believe, is none of my business. Each to his own. However, I suspect that that is not in line with Christianity.
And while I went to church every Saturday (yes, I was brought up in the Seventh Day Adventist Church, considered a sect by many) for the first 18 years of my life, Grandma always said that church won’t get you into heaven. She would add with a wicked grin that people sit all righteous in church on a Sunday, but come Monday the husband would beat up his wife again.
A bit more than a year ago, Gerry and I did a photography and textile collaboration while visiting my mum and the rest of the family in South Africa. For about six weeks every day he made a photo, while I stitched a haiku. I started to develop a stitch font which had to be easy and quick, forming letters with the least amount of stitches. There are some letters I’m not super happy with, but I haven’t been able to come up with anything different or more elegant, yet still quick and easy.
For the haikus I never used numbers, but to reference the Bible verses, I had to come up with a set of numbers to match the letters.
I stitched the verses in my home language, Afrikaans. It is a language all on its own – it is not Dutch, even though a lot of people seem to think it is the same thing.
Going through the slow process of stitching, I find it amusing how strange some of the words seem. For instance words that are not really in use anymore – it is not part of the spoken language. It never bothered me, until I now have to spell it out letter for letter. Having said that, I still have an old translation of the Bible. There have been newer, more ‘modern’ versions released in Afrikaans. But there’s something I find quite special about this old, formal translation.
On a previous occasion when I stitched some tea bags, a friend mentioned that it reminded her of the Turin Shroud. I love that analogy.
There are certainly elements of these used tea bags that are reminiscent of the Turin Shroud. It did cross my mind a couple of years ago to cut out and arranged the tea bags to make a replica of the Shroud of Turin, but that would be a mammoth undertaking (being 4.4×1.1 metres in size, although one source gives it as 3.66×0.91 metres), yet something I might still consider one day.
Tea bags are quite fiddly to stitch. And some of mine are already a few years old, so they have started to biodegrade. They are made from natural fibres and are meant to be biodegradable. I just didn’t think it would happen so quickly. Having said that, I’ve noticed the ones that were piled up in a paper cup with the tea leaves still inside, biodegraded even more rapidly. They were unusable.
To try and prevent the panel from falling apart, I added a very lightweight piece of stretchy iron-on vilene to the back. It made a huge difference to the strength of the cloth, as you cannot make multiple stitches within a thread of each other without the tea bags tearing. And a number of the letters are created that way. Not to mention how easily the bags rip when you get a knot in the thread!
Even though I’m not mad about the vilene at the back, I would not have been able to stitch this panel without it.
Since the panels were two-sided, I opted to make my teabag quilt four metres long, and folded in half so you don’t see the backside, and to be two metres tall in the end (similar to the other panels).
However, I really love the hieroglyphic look of the stitching at the back of the words, and I would like to still one day make this the focus of an artwork. But for now I’ll just park that idea.

Panel 3
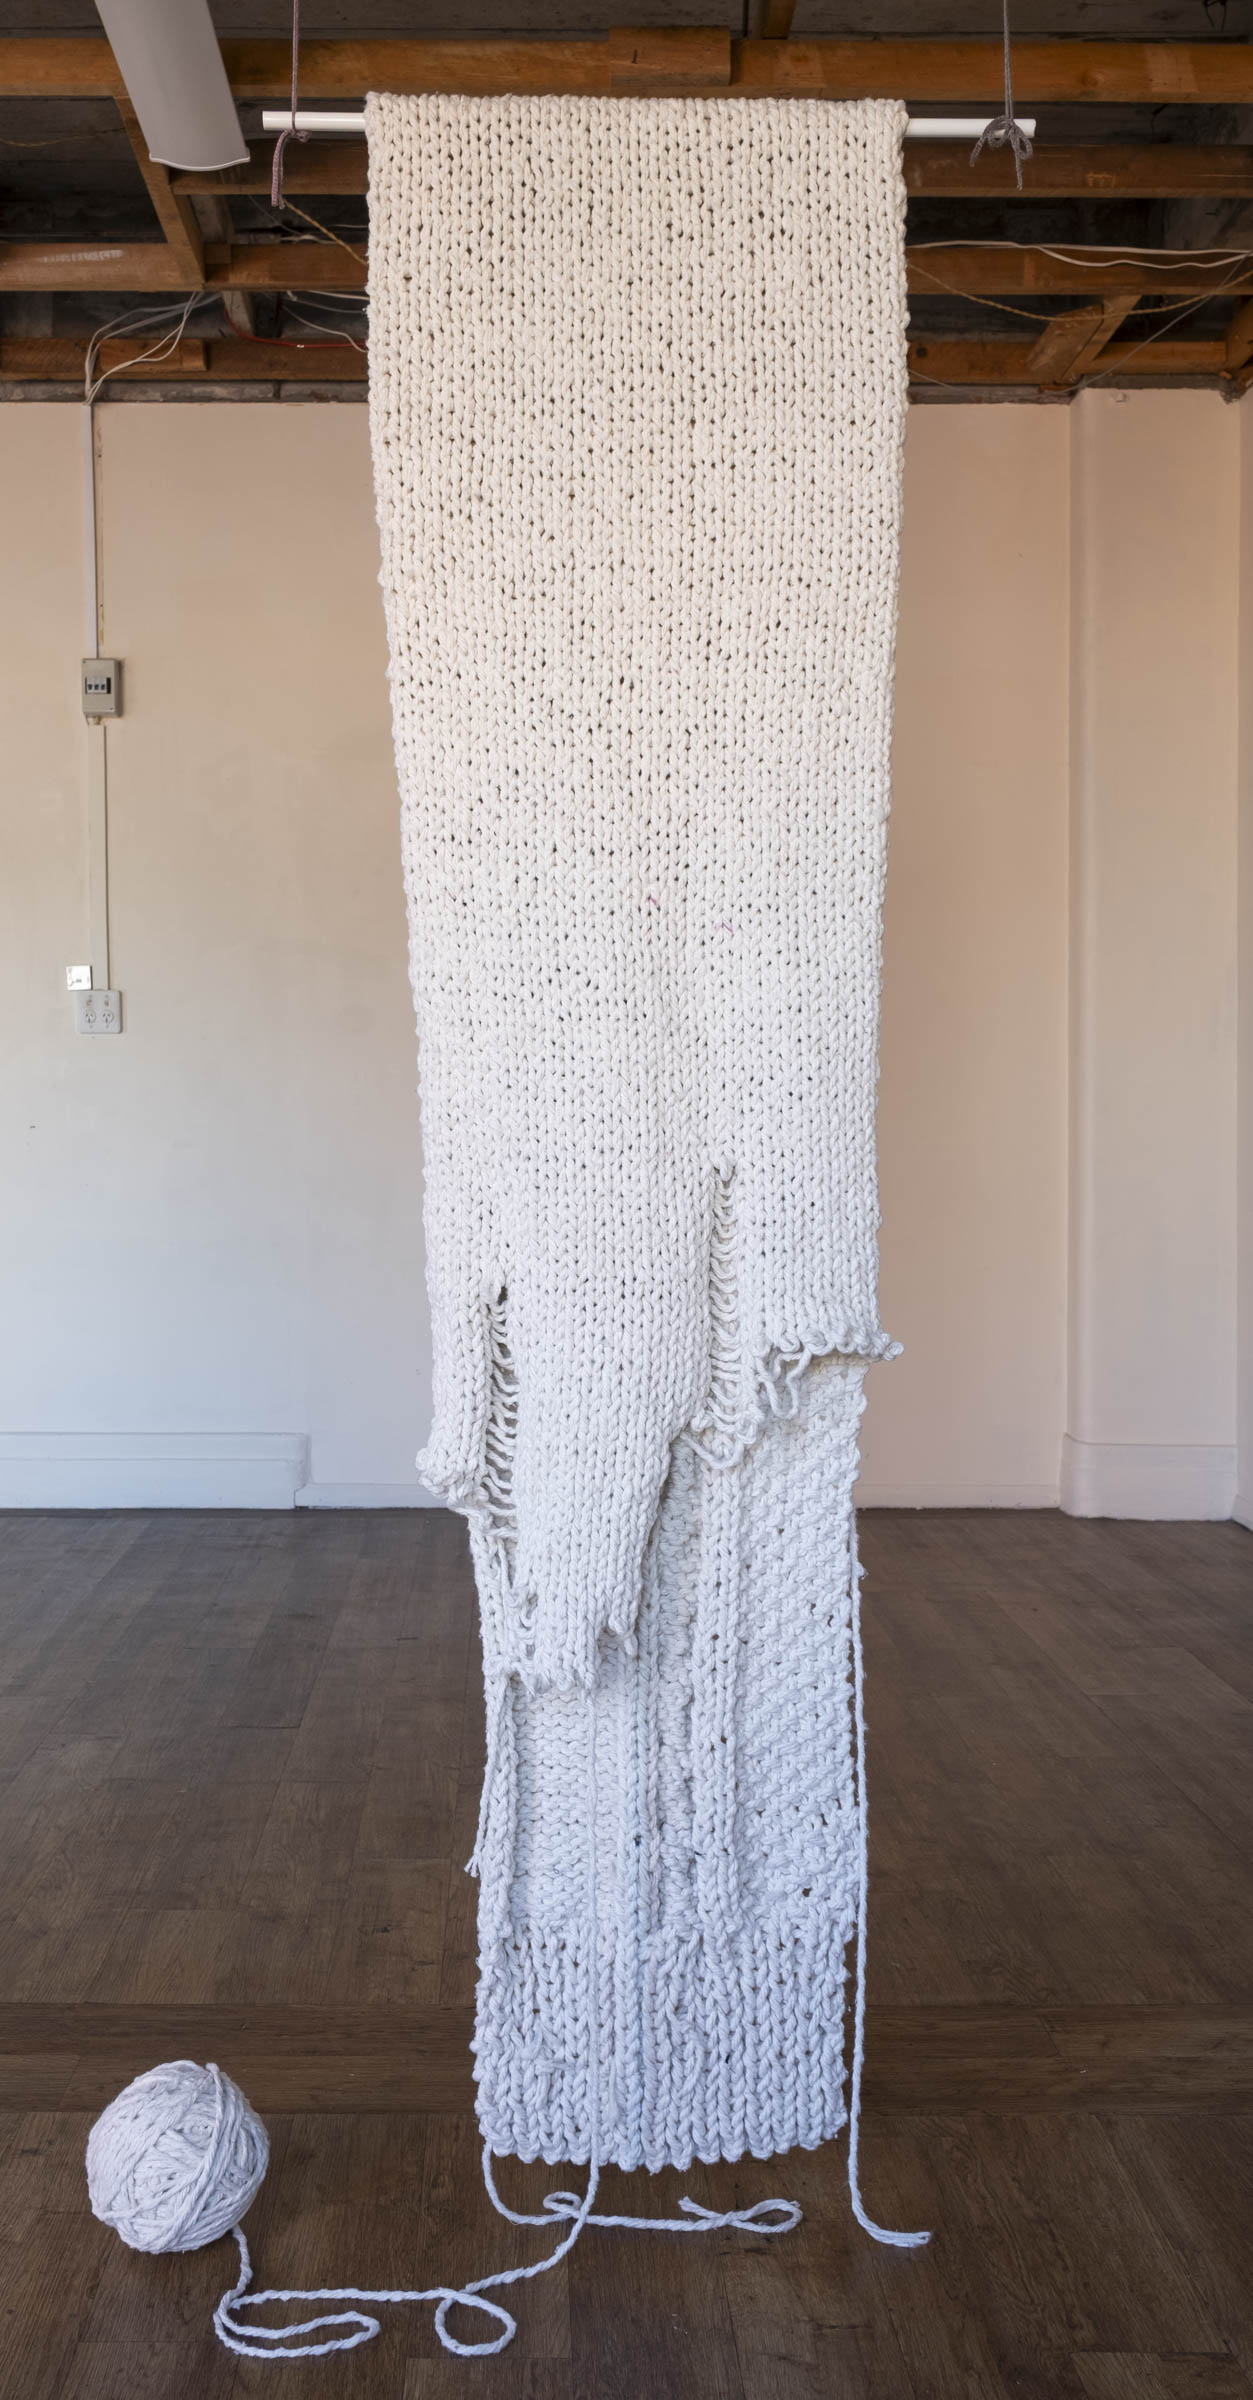
My third panel is a piece of knitting. I wanted it to be bulky and oversized, so I used a cone of mop rope I bought last year when visiting family. You get knitters and you get crocheters. When I rationalise the two, crocheting makes so much more sense; only one hook, you have more flexibility (me thinks), etc. But for some reason I always go back to knitting. I guess it might be the mindless, no need to look, repetitive approach that I find calming and enjoyable? Not sure, but I do like to knit.
Mum was a knitter. My sister is a crocheter. My grandma was more of a crocheter than a knitter, at least from when I came long. And I have an aunt who also used to crochet baskets, amongst others. But my mum knits. And I knit.
Knitting cables and diamonds have always been part of my mum’s skill set. Whenever I wanted a cosy, chunky, cabled jersey, my mum would knit it for me by hand.
But she was also a knitting-machine knitter, something that seems to be making a comeback. When I was small I would always sit underneath the knitting machine (a double bed machine) watching the knitting appear. I simply loved watching it grow longer and couldn’t wait to hook in the weights to lightly pull the work down. To my mum’s frustration, I’m sure, I would sometimes pull too hard.
An annual staple for my mum was to knit commissioned white cotton socks for the local optometrist. He wouldn’t wear anything but those handmade socks. How one can knit socks (by hand or machine) is beyond me – it just seems too intricate. My preference is for mindless straight up and down.
But for this work I wanted to attempt to knit a cable. I guess I’m a bit sentimental that way. With mum on the other side of the world, I reverted to Google. And to my surprise, it is the easiest thing in the world!
I had to figure out where I wanted the cable, what I wanted on either side, and ended up starting over a couple of times.
For the bottom 15cm or so, I knitted a normal rib – one plain, one purl. But from there I wanted to include a bit more texture so went for moss stitch on the one side and plain on the other side of the cable.
Being thick ‘yarn’ and size 15mm needles (which I bought from an Opshop for $2), the knitting went reasonably quick, unlike all the other panels, which took more than a month each. And some more than two months!
To knit a cable you need a short needle with pointy ends on both sides. This is so that you can slip the stitches off on the one end, and knit from the other end. Of course this is not something you just waltz in and buy at an Opshop. So I looked in the local fabric shop, and at $17 I decided we needed to make another plan. We bought a 15mm dowel, which Gerry sawed to the right length, sharpened the two sides with a grinder, and Bob’s your uncle. Worked a charm.
A fellow artist at Square Edge, when seeing me working on the long stretch of knitting, said she just wants to roll up in it. Perhaps the colour helps to make it look more cuddly, but being made from mop rope, it is rather heavy. Soft, but heavy.
I remember my grandma’s feather blankets were also heavy. Lying under it felt very safe. It was made from a specific kind of fabric with a super fine weave (high thread count?) in order to keep the feathers from poking through (these days down is used). And who remembers pillow fights with these heavy feather cushions? You could send a little brother or sister flying across the room.
And of course grandma’s patchwork blankets were equally heavy. Each time the patches started to wear thin she would just add another patchwork layer. I still have one of her patchwork blankets of which the outer layer is made with shweshwe (traditional fabric of primarily the Sotho but also Xhosa and other cultures in South Africa, containing geometric patterns. Nowadays it is made in all kinds of colours, but back then it was initially only navy blue, and brown, and later also maroon, red, and dark green). This particular blanket is very heavy. I suspect if I start taking off the layers there will be quite a few.
Perhaps the old folk were onto something – they must have known that heavy blankets make kids feel safe. With all our modern advances and development everything is lightweight and fluffy and plastic, to the point where weighted blankets have become a thing again, and you pay good dollars for it.
Weird how we’re going backwards to go forwards.
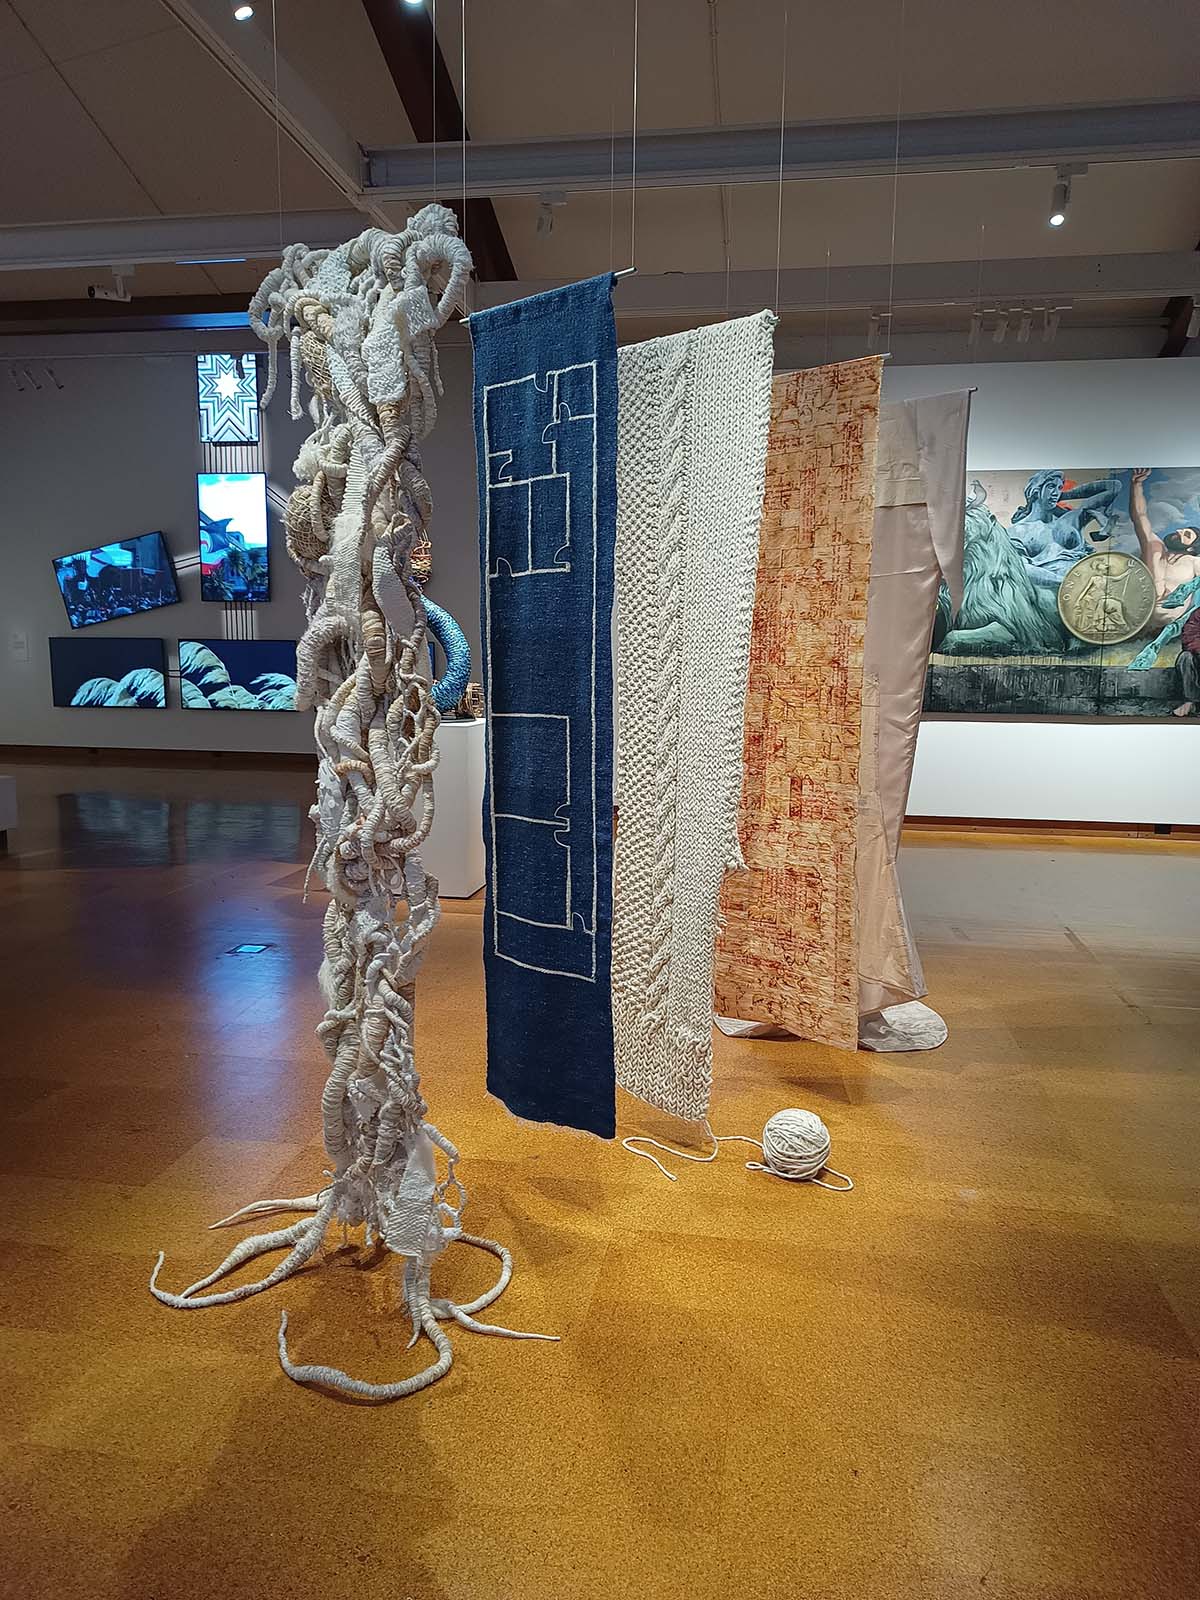
I finished the ‘backside’ of the knitting by dropping stitches and knitting some bits longer than the rest. As a child-knitter, I would occasionally drop a stitch only to discover it a number of rows later, and I was always amazed that my mum could pick it up and weave it through the rows to correct my mistake. I wanted to include this in the work, and also added a ball of yarn to finish it off.

Panel 4
The fourth panel in my series is a bit of a transition for me. While I’ve always been tangled up in textiles, weaving wasn’t one of the family’s skill sets.
This panel was a metaphor for my transition between countries, a stepping stone between the two. But also for it to be a progression towards a new way to use textiles. Weaving is a symbol of interconnectedness, and seemed a fitting process to represent past and present.
I don’t have a loom, and don’t consider myself enough of a weaver to invest in one, so I had to fashion something resembling a loom. I made one with hair combs in 2024 while studying, which was doing the trick. For the heddle, I counted the number of teeth of all the combs together and measured the distances between them. Then I drew a 1:1 size heddle, which I then had laser cut from a very thin sheet of plywood at Blueprint (a community space at our library with printers, cutters, 3D printers, laser cutters, sewing machines and a host of other things which the community can use).
My style of weaving is more related to tapestry weaving, for which I think a heddle is not really used, but I do a lot of ‘straight up and down’ over-and-under weaving, so it made sense to have something to separate the warp strands.
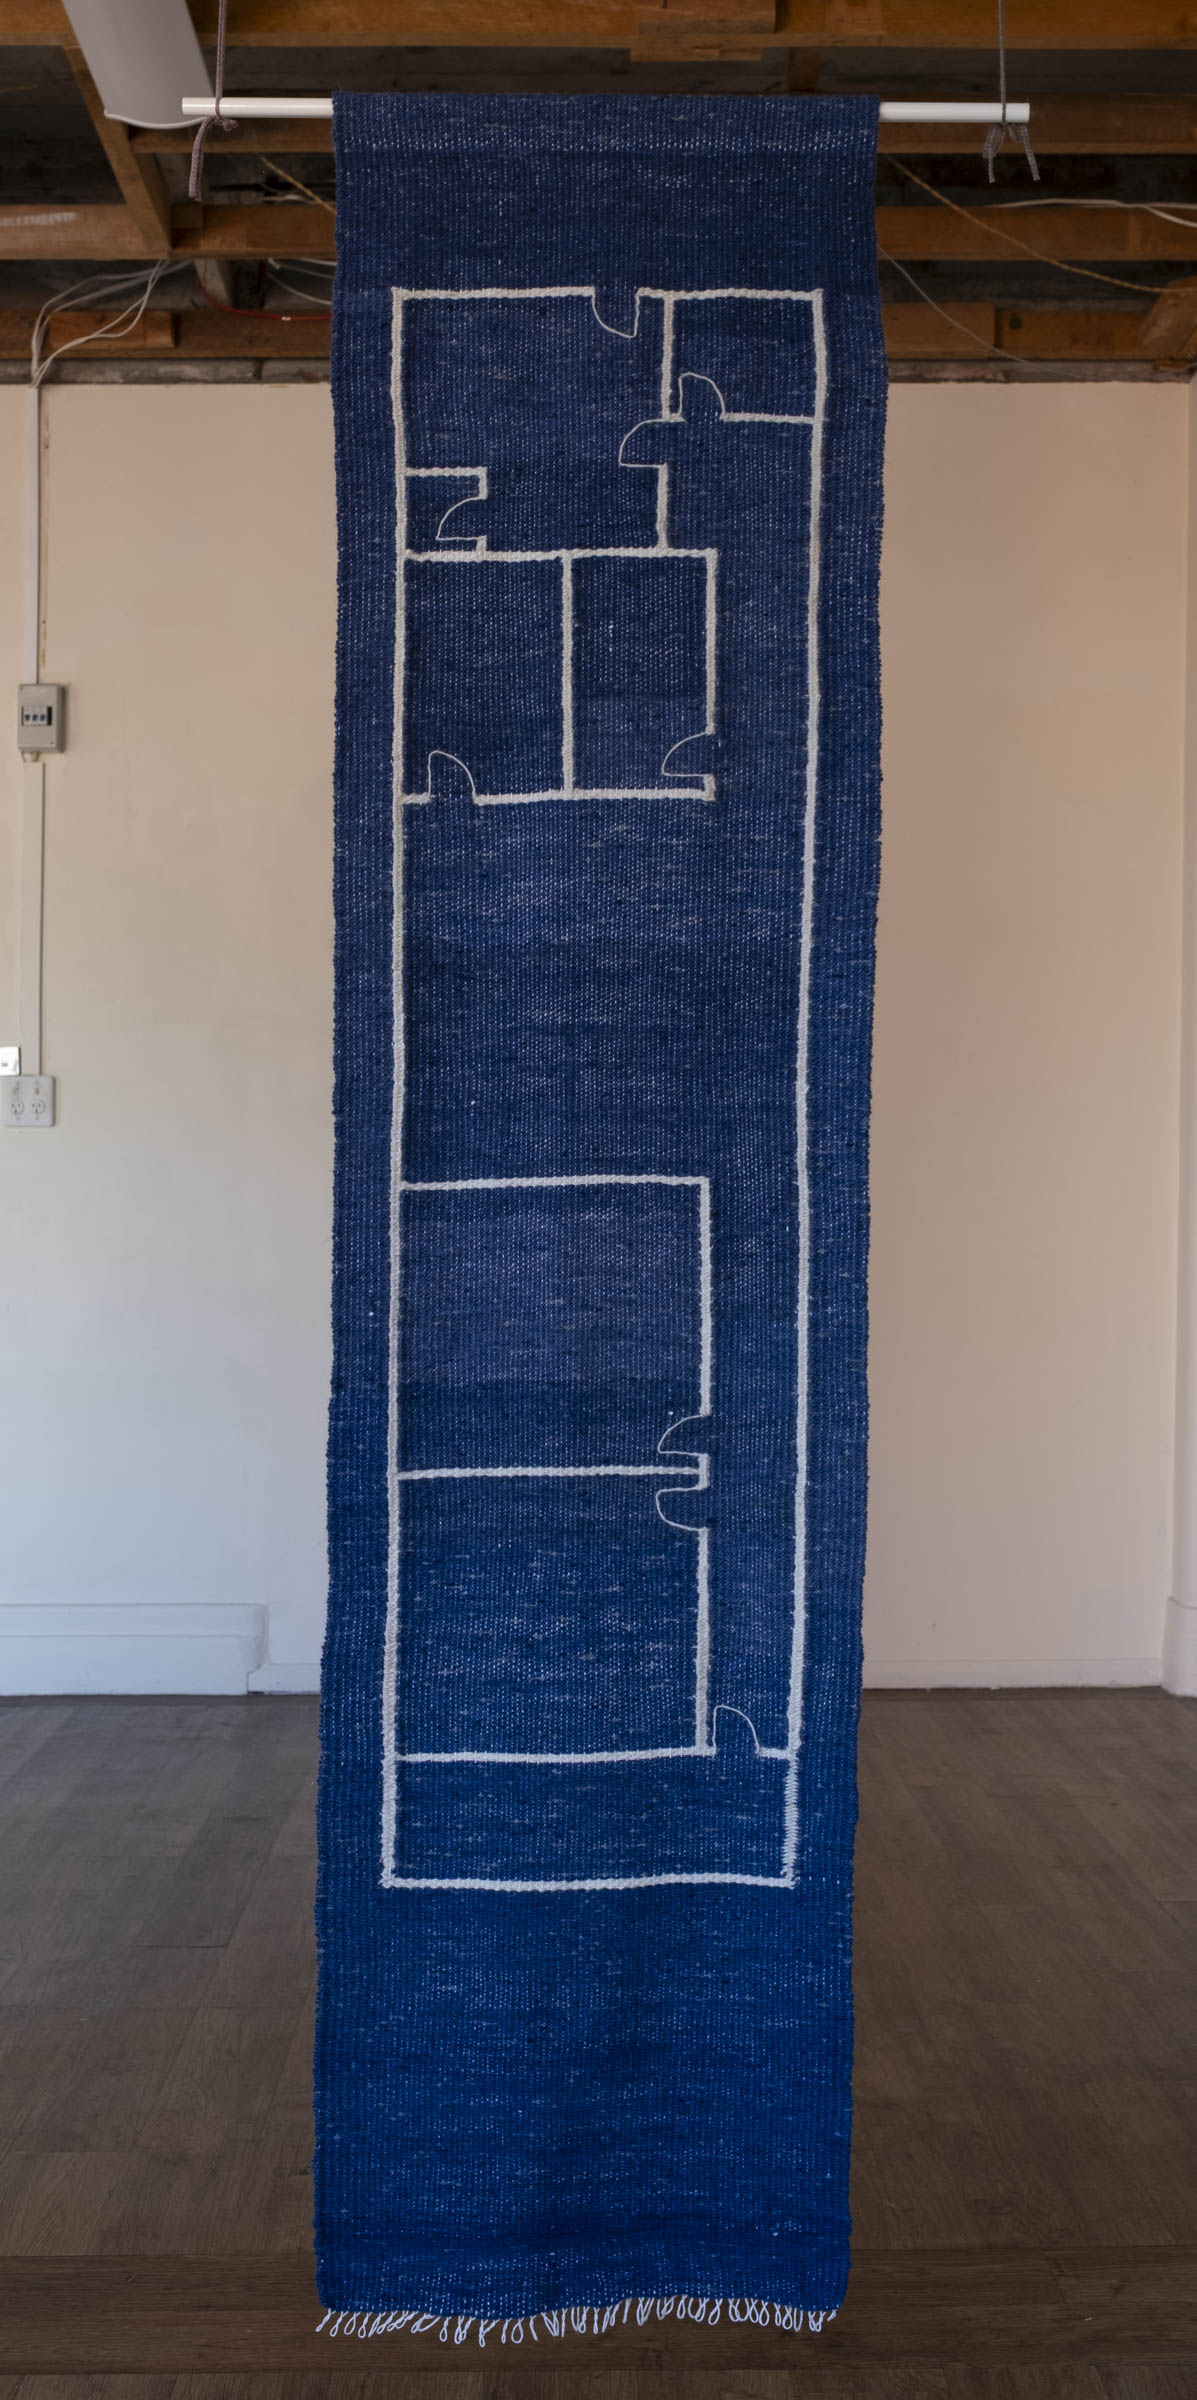
Each of the individual panels in my work represent memories from my childhood. For this panel, I created a blueprint of the floor plan of a childhood home.
We stayed in this house from when I was in Standard 1 (Grade 3) until I was in Std 5 (Grade 7) – 8 to 13 years old. It was the first house we lived in after my parents divorced. I never saw my dad again, and he never bothered to see us, pay maintenance of any kind, or send so much as a birthday card.
Our home was a semi-detached house my mum rented, with an interesting individual living on the other side of the wall that separated the building into two homes. He was an older man whom I, as a child, thought ‘wasn’t right in his head’, because he stuck matchboxes against his wall as decorations, and he owned hardly anything. He would poke his finger through the holes in the six foot corrugated iron fence between our backyards, and I would try to hit it with a stick. Thinking back, all of it was rather bizarre (and just a little bit unnerving).
We also thought this house was haunted as we could hear the sound of footsteps in the long corridor, and some of the lights would go on or off at random times. This was likely because it was an old house with wooden floors and brass light switches. The toilet had a chain and the bathtub was a cast iron clawfoot, all things that were woefully out of fashion in the 70s. I never brought friends home.
For five years we stayed in that house until the owner decided to sell the property and we had to move. I would say the bulk of my childhood memories were made there.
To experiment a bit more, I decided to hand dye the wool with natural dye, which of course had to be indigo (to make the blueprint), so prepared a bed and planted woad seeds in December 2024.
Since preparing the dye is quite a lengthy process, I had to have a day set aside to make the woad vat.
First I picked and rinsed the leaves, before tearing them into chunks. Then I added boiling water to fill a bucket almost to the brim. I let that sit for about an hour, before sifting and squeezing out the leaves.
Then it was time to add soda ash to ensure a pH level of 9 or higher, followed by aerating the vat by pouring the liquid back and forth between buckets for about 10 minutes.
Air is what makes indigo react, so the idea is to keep the air out of the vat. I know. Aerating the vat didn’t make sense to me either, but it is to transform the dye precursor (isatin) to oxidise and become the blue dye (indigotin).
I then sprinkled a spoonful of colour remover (which removes the oxygen) over the top of the liquid and then, with the lid on, let it rest again for another hour.
And then the exciting part started. I added the wet skeins of wool carefully, and kneaded it underneath the surface, and without lifting it out of the liquid, for at least five minutes. As soon as it comes out of the liquid and gets exposed to oxygen, the indigo reacts and turns the wool from light yellow-green to blue.
Just like magic!
As exciting as the woad indigo dye is, and as much as I am happy about the skeins I got, I couldn’t dye nearly enough wool with my 1kg of woad leaves, so had to revert to store-bought dye.
Despite dyeing a good amount of skeins, I realised halfway through that I won’t have enough and had to dye another batch. And since my pot can only hold a certain amount of wool at a time, the skeins came out all shades of indigo. But I figured that blueprints aren’t super even either, also using a light sensitive process, so I kept going and ended up liking the different shades.
The next little hiccup was to warp the ‘loom’. Since it is one long piece of thread that stretches 2.5 metres for each warp strand, the tension is quite high. Plus going up and down the ladder a million times, and threading the strand through the heddle on each pass, made the whole process very slow going. And then, just as I started to get the hang of it, the wool snapped, meaning all the warp strands immediately lost tension, fell off the bottom teeth of the combs and I had to start over.
After a few more attempts with the yarn, I was ready to throw the yarn out the window, loom and all. That’s when I thought I needed expert help, so I messaged a skilled weaver and educator who kindly explained a few things to me.
I started over with much stronger white cotton thread – up and down the ladder while keeping the warp strands tight. Never did I think that warping my homemade loom would be such a mission.
The cotton used for the warp, was bought together with the mop roap when we visited family. There are many fabric stores in the town where I was born and raised, and the store where I bought this specific cone of cotton is one of the larger ones. At the time I didn’t have a plan or purpose for the cotton, but I bought it nonetheless, as with one NZ Dollar being worth more that ten South African Rands, some things are pretty affordable over there.
After my struggles with the wool warp, and the advice to use cotton, I went through my stash in search of something to use, and rediscovered the cotton. A few days after finally getting the warping done and starting with the weaving, I spoke to my brother about the floor plan, and the house we lived in. He mentioned that our old home is now a fabric store, and I thought, what an uncanny coincidence that you can now buy fabric in the house where I spent five years of my childhood. After we moved out it was tuned into office space, and that’s the last I remember of the place.
But then it gets even more surreal – it was from this specific fabric store that I bought the cotton thread! The area had changed so much, and with the entrance of the store being from the back of the old house, around the corner of the street, where all the fences and outbuildings were torn down, I didn’t recognise anything and therefore never put two and two together. It used to be four semi-detached houses (two sets of two) with a passageway between the two sets of houses where I played with the neighbour kids. But the whole shebang is now one large fabric store. What are the odds – you cannot make up this stuff even if you try.
I love the fact that this particular panel, showing a house plan from my childhood, now also represents the fabric store where I bought the warp-cotton, and that this is interwoven with weft made from 100% NZ wool.
In Te Ao Māori ‘weaving symbolises the interconnectedness of life, growth, and evolution, reflecting the essence of love shared and received.’ [https://hospicetaranaki.org.nz]
When one door closes, another door opens. It was not the first time we rented a place that was sold from under us. But most of the time something better comes along. Or is it just a case of a change is as good as a holiday?
This weave took about a month to get the bulk of it done. There was still some finishing off to do, including working away all the tails, but for the most part progress was good.
When you are a painter you can sometimes ‘strike it lucky’ and create a masterpiece in a day or a weekend. Or in one fell swoop. But textiles don’t work that way. Anything and everything about textiles is time consuming, whether you’re making fabric, thread, a blouse, or art. Textiles don’t stick to a canvas (textile!) like paint. You have to purposefully stitch it in place.
There are no ‘shortcuts’ with needlework, and that would in any case defeat the purpose of it. For me a big part of the attraction of textile work is the mindfulness of doing repetitive things like stitching or weaving or wrapping things with thread – to switch off and let your hands do the thinking.
That’s the beauty of it. Except when you’re in a hurry! For each work I have to set aside at least a month, most of the time closer to two months. My do-undo-redo approach often also adds days or weeks to the process.

Panel 5
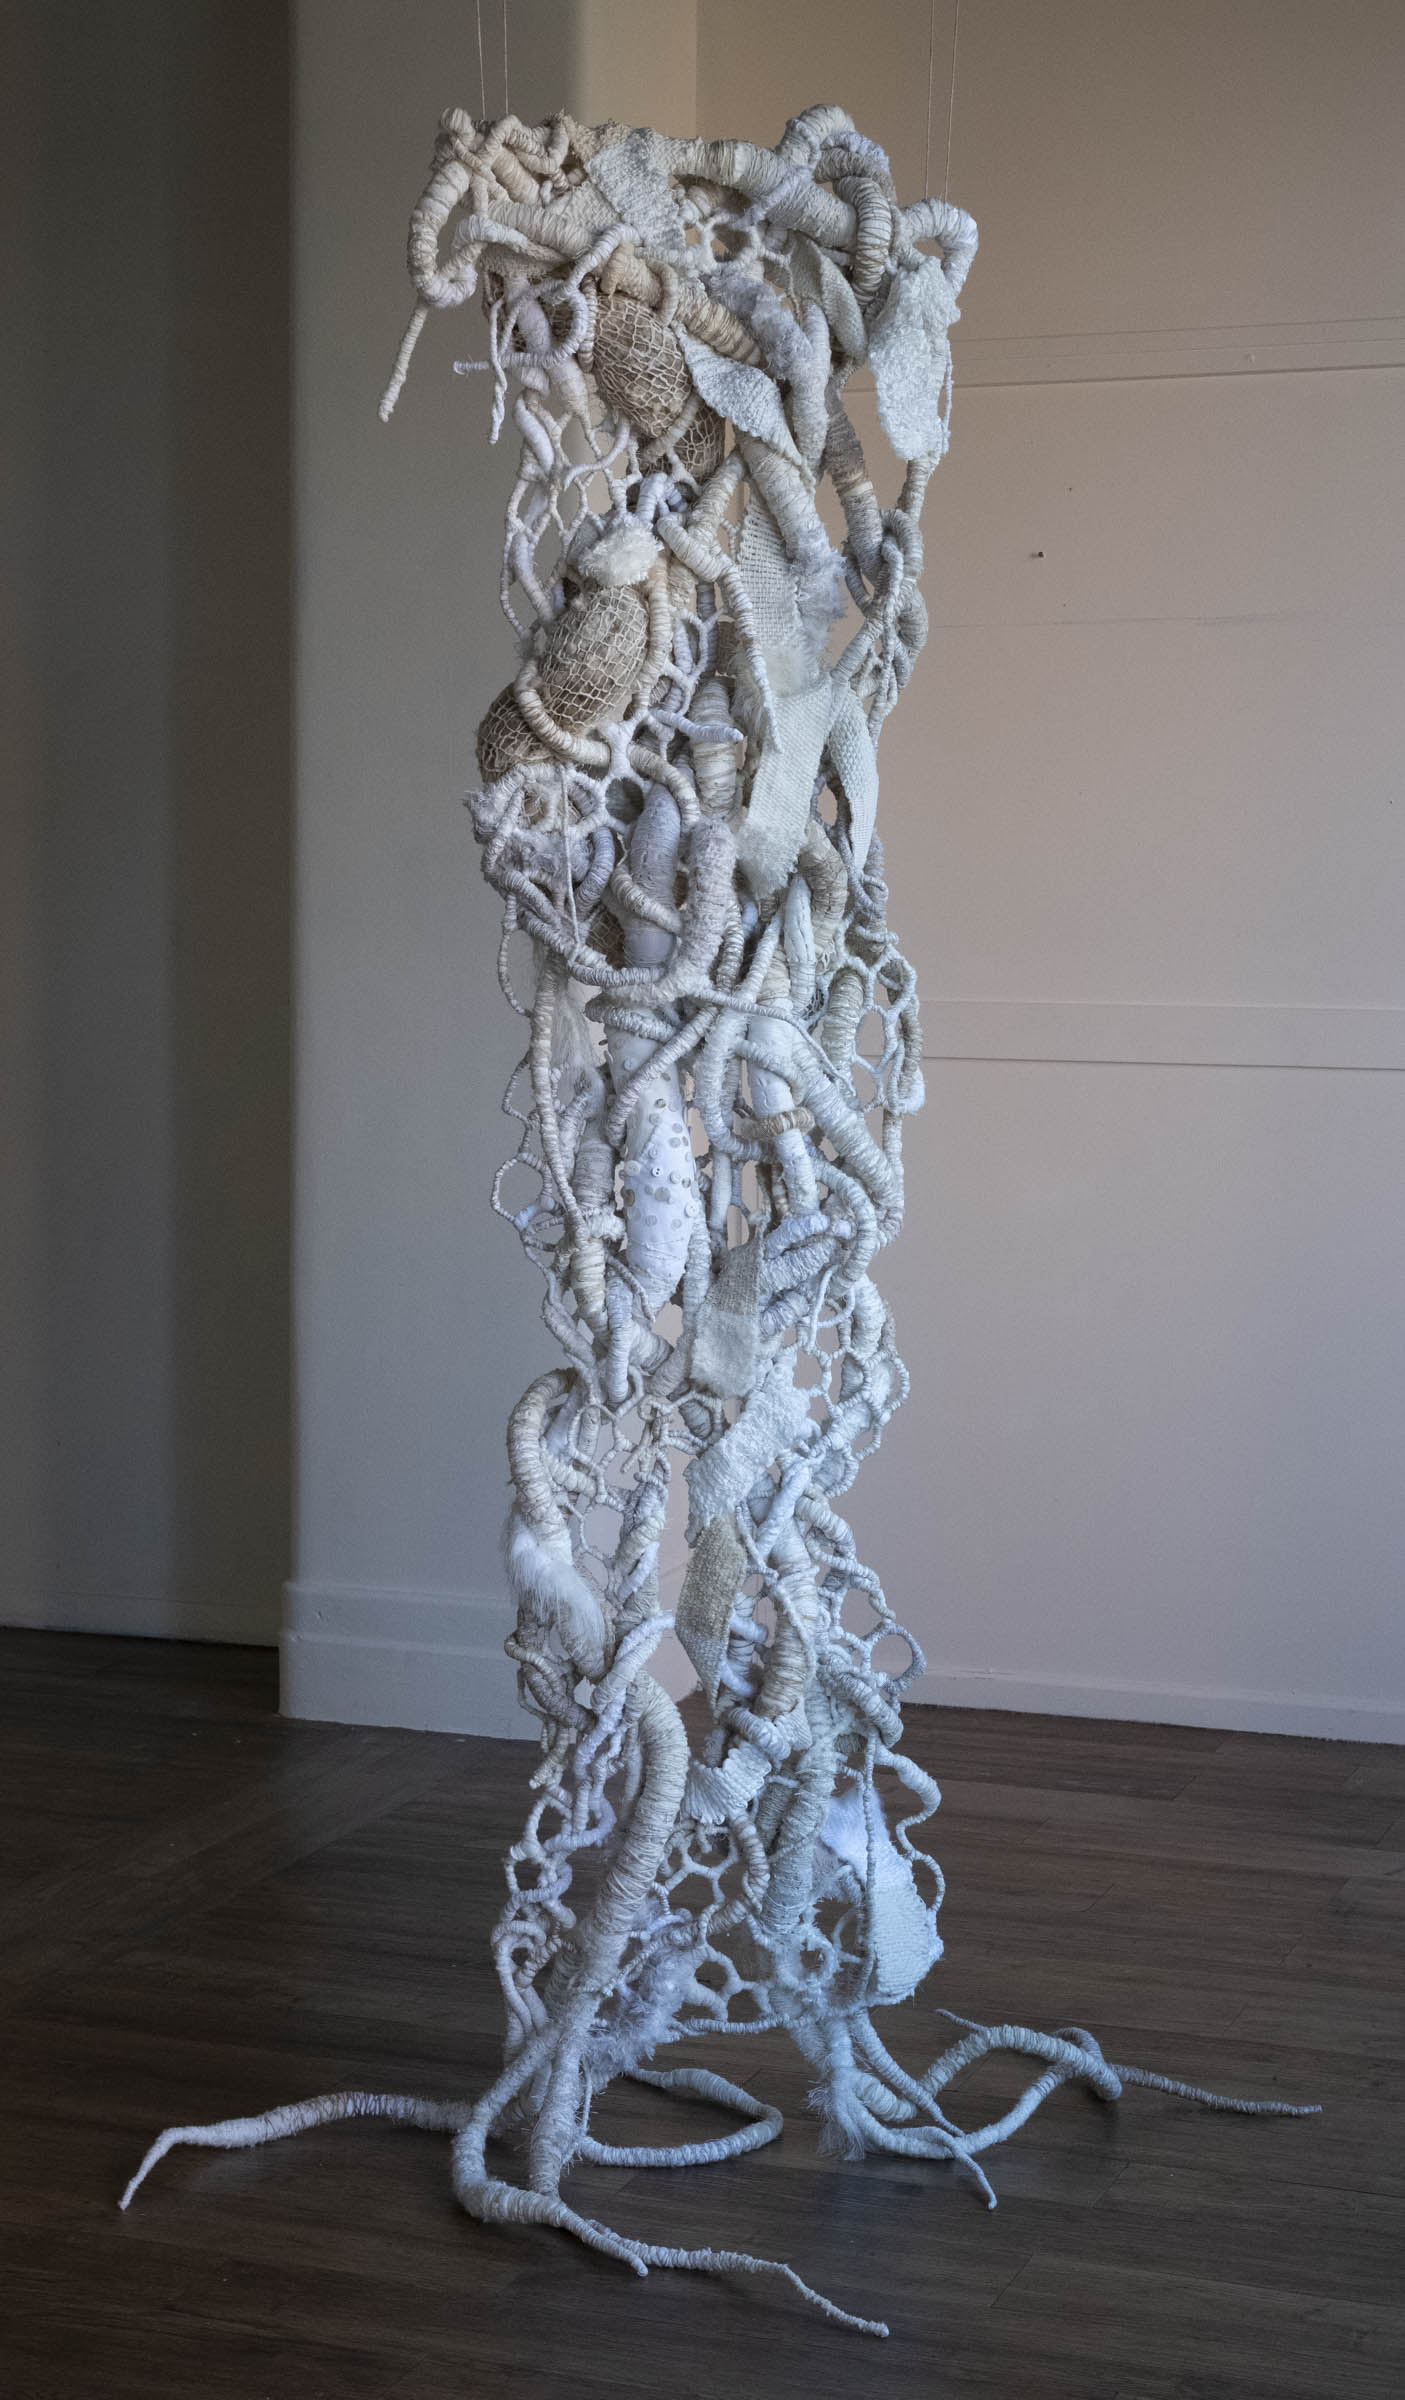
The fifth and final panel in my set is about integration: into a new country, a new environment, new cultures, new languages, a new way of living.
It is about finding my feet, finding myself, trying to put down roots. I think migrants will always be in an in-between space/place, and hence always outsiders both where they are and where they come from. I am not born a kiwi and that can never change. I can also not go back and think reintegration in my homeland is possible, due to all the experiences and changes that have happened in me.
The white colour tone of this panel is also a metaphor for a clean slate, new beginnings. I have started on some new work as a metaphor for putting down roots and reintegrate in a new environment/community a few months earlier, and thought it would be an apt final panel to the work. I therefore started off by wrapping some chicken wire, as I did with the other works in my Enroot series – a body of work that explores integration, rooting, settling in.
When a fellow artist walked into the studio, she said the wrapped wire reminded her of basket fungi (a native to NZ and Australia). It is not the first time someone said that – a friend previously mentioned that these look like Ileodictyon cibarium. I had to Google it when she first shared the name.
The first time I wrapped chicken wire was when I made a voronoi vessel. I always get scratched with wire whenever I try to do something with it, so decided one evening next to our fire pit to wrap it with fabric to ‘soften’ the wire and turn it into a friendly medium to work with. I liked the look, and knew I had to use it somewhere.
From the day we are born to the day we die, we are wrapped in textiles. And who can forget the image of a stork bringing the baby wrapped in cloth?
Inspired by Japanese furoshiki (gift wrapping with cloth) and musubi (the spirit of birth or becoming), wrapping and binding, together with weaving, have become important elements in my practice. These seemingly mundane acts of wrapping and binding, tying and weaving, are powerful tools of repair, growth, and interconnectedness.
The act of furoshiki reminds us of our relationship with others, the environment, and the world around us. Wrapping also symbolises protection, care, and a sense of security. To ‘tie the knot’ signifies a deepening relationship between people, between hearts, but also refers to connections and connectedness.
‘Musubi refers to the power of creation and the divine work of spirits. It represents how the act of binding brings forth sacred energy.’ [https://musubism.com/blogs/news/the-profound-meaning-of-musubi-interwoven-with-japanese-spirituality/]

And that’s a wrap!
The set of five panels shows a progression of my life in textiles, from being introduced to the basics of knitting, crocheting and dressmaking in my childhood, to finding meaning in utilising textiles as art.
Eight months full time (almost) of working on the five panels, exploring different techniques showcasing some phases of my life in and through textiles.
I am grateful for the opportunity to let the work change and develop as time went on. A vague idea had time to pass over the pebbles seven times to get to the end result, and I’m pleased with how it turned out.

Leave a comment